Disclaimer: This content is for educational purposes only, not medical advice. Always consult with a doctor before making significant changes to your diet, especially if you have pre-existing health conditions.

As I stand in my Asheville kitchen on a crisp spring morning, the scent of fresh oranges takes me back to my grandmother’s sunlit dining room. Her orange bars recipe was legendary in our mountain community—tart yet sweet, with a buttery shortbread crust that melted in your mouth. Growing up in North Carolina, I learned that the best recipes don’t need to be complicated to be spectacular. These orange bars combine simple ingredients with bright citrus flavor for a treat that’s both refreshing and comforting, perfect for bakers at any skill level.
IN THIS ARTICLE
Key Takeaways: What You Need To Know
– Orange bars combine a buttery shortbread crust with a vibrant citrus filling that’s similar to lemon bars but with a sweeter profile.
– The recipe requires just 10 minutes of prep time and common ingredients most home cooks already have.
– These bars keep well for up to 5 days when properly stored, making them perfect for make-ahead desserts.
– The versatility of this orange bars recipe allows for countless variations, including blood orange, mandarin, or even mixed citrus versions.
– You’ll need a 9×9 baking pan, mixing bowls, and a microplane zester for best results—no special equipment required.
What Makes This Orange Bars Recipe Special
The perfect orange bars recipe balances sweet shortbread with bright citrus filling for an irresistible treat that’s easier to make than you might think. Unlike fussy desserts, these bars require minimal ingredients and simple techniques, making them ideal for beginner bakers while still impressing experienced cooks with their vibrant flavor.
When I first started baking in my tiny Asheville apartment, citrus bars intimidated me. But this orange bars recipe changed everything—it’s virtually foolproof and produces consistently delicious results. The magic lies in using both zest and juice for maximum orange flavor without any artificial additives.
The History and Appeal of Citrus Bars
Citrus bars have deep roots in Southern baking traditions, with lemon versions appearing in cookbooks since the 1960s. Orange bars are their sweeter, less common cousin—offering a flavor profile that’s familiar yet refreshingly different. I remember my grandmother explaining how orange desserts gained popularity in North Carolina when citrus became more readily available in our mountain communities.
The appeal is universal: that perfect balance between a crisp, buttery base and a soft, custardy topping. Plus, the bright orange color makes these bars as beautiful as they are delicious. In my cooking classes, I’ve noticed these are often the first dessert to disappear from the serving platter!
Why Home Cooks Love This Recipe
What makes this orange bars recipe a standout in my collection is its forgiveness. Even if you’re new to baking, the simple ingredients and straightforward method mean you’re almost guaranteed success. The bars consistently turn out well, which I can’t say for every dessert recipe I’ve tried!
My neighbor Sarah, who swears she “can’t bake to save her life,” made these for her daughter’s teacher appreciation week. “Chloe, I actually felt like a real baker!” she told me, beaming with pride. “They turned out perfect on the first try, and everyone asked for the recipe.”
The versatility is another huge plus. You can serve orange bars at virtually any gathering—from casual backyard barbecues to more formal holiday celebrations. They’re equally at home alongside a cup of coffee or dressed up with a scoop of vanilla ice cream.
Essential Ingredients for Perfect Orange Bars
The best orange bars recipe requires quality ingredients centered around fresh oranges, butter, and eggs. For authentic flavor, use freshly squeezed orange juice and zest from unwaxed oranges, preferably organic. The shortbread base needs cold butter for proper texture, while the filling relies on room-temperature eggs to create its signature smooth consistency.
When I teach cooking classes from my Asheville kitchen, I always stress that simple recipes like orange bars depend heavily on ingredient quality. The star is obviously the orange component—when I can, I source mine from local North Carolina farmers markets where the fruit is picked at peak ripeness.
Key Components for the Shortbread Base
The foundation of any good orange bars recipe is a proper shortbread crust. This requires:
– 1½ cups all-purpose flour
– ½ cup granulated sugar
– ¼ teaspoon salt
– ¾ cup cold unsalted butter, cubed
– 1 tablespoon orange zest
I’ve learned through countless batches that cold butter is non-negotiable here—it creates those delicate layers that make shortbread so irresistible. When I rush and use softened butter, the texture becomes more cake-like than crisp.
The addition of orange zest directly into the crust is my special touch—it ensures that citrus flavor permeates every bite, not just the filling. My grandmother taught me this trick, and it makes all the difference between a good orange bars recipe and a great one.
Critical Elements for the Orange Filling
For that perfect silky orange filling, you’ll need:
– 4 large eggs, room temperature
– 1½ cups granulated sugar
– ⅓ cup all-purpose flour
– 2 tablespoons orange zest (from about 2-3 oranges)
– ¾ cup freshly squeezed orange juice
– 1 tablespoon lemon juice (to brighten the flavor)
Temperature matters tremendously here—cold eggs can cause the filling to curdle or become lumpy. I always set mine out at least 30 minutes before baking. And while it might be tempting to use bottled juice, the difference in flavor when using fresh is remarkable.
The small amount of lemon juice is something I discovered after years of tweaking this orange bars recipe. It adds complexity without overwhelming the orange flavor—that perfect hint of tartness that balances the sweetness. As we say in North Carolina, it’s the “secret ingredient that nobody knows about but everyone can taste.”
Orange Bars
Equipment
- 9×9 baking pan
- Mixing bowls
- whisk
- spatula
- Oven
Ingredients
- 1 1/2 cups all-purpose flour
- 1/2 cup granulated sugar
- 1/4 tsp salt
- 3/4 cup unsalted butter (cold, cubed)
- 1 tbsp orange zest
- 4 large eggs
- 1 1/2 cups granulated sugar (for filling)
- 1/3 cup all-purpose flour (for filling)
- 2 tbsp orange zest (for filling)
- 3/4 cup fresh orange juice
- 1 tbsp lemon juice
Instructions
- Preheat oven to 350°F (175°C) and line a 9×9-inch baking pan with parchment paper.
- In a bowl, combine flour, sugar, salt, and orange zest.
- Add cold butter and mix until crumbly, then press evenly into the pan.
- Bake crust for 15–18 minutes until lightly golden.
- In a separate bowl, whisk eggs and sugar until combined.
- Add flour, orange zest, orange juice, and lemon juice, whisking until smooth.
- Pour filling over hot crust and return to oven.
- Bake for 20–25 minutes until the center is set with a slight jiggle.
- Cool completely, then refrigerate for at least 2 hours before slicing.
Notes
Nutrition
Step-by-Step Orange Bars Recipe Instructions
Creating perfect orange bars involves two main phases: making a shortbread crust that’s pre-baked until golden, then adding a vibrant orange filling that sets to a silky consistency. The process takes about 45 minutes of hands-on time plus cooling, with careful temperature monitoring being crucial for success. Following these precise steps ensures bars with the ideal texture—crisp bottom and smooth, custard-like top.
I still remember my first disastrous attempt at citrus bars in my tiny Asheville apartment kitchen—the filling was runny, and the crust was burnt on the edges but raw in the center. After much trial and error, I’ve perfected this process to be accessible even to beginning bakers.
How to Prepare the Perfect Crust
1. Preheat your oven to 350°F (175°C) and line a 9×9-inch baking pan with parchment paper, leaving overhang for easy removal.
2. In a food processor, combine flour, sugar, salt, and orange zest with a few pulses.
3. Add cold butter cubes and pulse until the mixture resembles coarse sand with a few pea-sized butter pieces remaining.
4. Press this mixture firmly and evenly into your prepared pan—I use the bottom of a measuring cup for a smooth, level surface.
5. Bake the crust for 15-18 minutes until it’s just beginning to turn golden at the edges.
The most common mistake I see in my cooking classes is underbaking the crust. It should have a slight color change—this ensures it won’t get soggy once the filling is added. While it bakes, I typically prepare the filling so everything moves efficiently.
Mixing and Baking the Orange Filling
1. In a large bowl, whisk eggs and sugar until well combined but not foamy (about 1 minute).
2. Add flour and whisk until smooth with no lumps.
3. Stir in orange zest, fresh orange juice, and lemon juice until everything is incorporated.
4. When the crust comes out of the oven, pour the filling directly onto the hot crust.
5. Return to the oven and bake for 20-25 minutes until the filling is set but still has a slight jiggle in the center.
6. Allow to cool completely in the pan on a wire rack before refrigerating for at least 2 hours.
The filling should set with a very slight wobble—overcooking will cause it to crack as it cools. I learned this the hard way during a summer potluck when I baked a batch too long, and they developed a network of cracks across the top! The filling will continue to set as it cools, so patience is key to perfect orange bars.

Troubleshooting Common Orange Bars Problems
When making orange bars, the most frequent issues include soggy crusts, runny fillings, or cracked tops. These problems typically stem from incorrect oven temperature, improper ingredient proportions, or insufficient cooling time. Following specific remedies for each issue will help you achieve professional-quality orange bars with the perfect texture balance.
Even after years of making this orange bars recipe, I occasionally encounter challenges. The difference now is that I know exactly how to fix them! Living in humid North Carolina taught me a lot about how weather conditions can affect baking, especially with citrus desserts.
Why Is My Filling Not Setting Properly?
If your orange filling remains stubbornly runny even after cooling, there are several potential culprits:
| Issue | Solution |
|---|---|
| Insufficient flour in filling | Be precise with measurements—use the spoon and level method |
| Underbaking | Filling should reach 170°F internally for proper setting |
| Too much juice | Measure after squeezing, not before—oranges vary in juiciness |
One spring when my sister visited from Charlotte, we made orange bars during an unusually humid day. Despite following the recipe exactly, the filling wouldn’t set. I learned that on very humid days, adding an extra tablespoon of flour to the filling can compensate for the additional moisture in the air—a trick I now swear by.
How to Fix Crust and Texture Issues
The perfect orange bars recipe should yield a crisp base and smooth top, but sometimes things go awry:
1. Soggy bottom crust: Pre-bake your crust until it’s truly golden, not just pale. Also, make sure you’re pouring filling onto a hot crust—this creates a barrier that helps prevent sogginess.
2. Cracked filling surface: This usually means the bars were overbaked or cooled too quickly. Next time, reduce baking time by 2-3 minutes and allow them to cool at room temperature before refrigerating.
3. Crust too hard to cut: Likely caused by overworking the dough. Pulse ingredients just until combined, and let the bars come to room temperature before cutting with a warm knife.
I once prepared these for a neighborhood potluck and was mortified when my crust turned out like concrete! Now I know to handle the shortbread mixture minimally—just enough to hold together when pressed into the pan. As my grandmother wisely said, “Treat your dough like you would a shy child—with gentle hands and minimal fussing.”
Creative Variations on the Basic Orange Bars Recipe
The classic orange bars recipe provides an excellent foundation for creative adaptations by incorporating complementary flavors or using different citrus varieties. Popular variations include adding cranberries for holiday appeal, incorporating coconut for tropical flair, or experimenting with blood oranges for visual drama. These modifications maintain the core technique while offering refreshing flavor alternatives.
One of my favorite things about cooking from my Asheville kitchen is putting my own spin on traditional recipes. While the classic orange bars recipe is delicious, these variations have become family favorites through years of experimentation.
Seasonal and Holiday Orange Bar Adaptations
Different seasons call for different flavor pairings, and orange bars are wonderfully adaptable:
Winter Holiday Orange-Cranberry Bars
– Add ½ cup dried cranberries to the filling
– Include 1 teaspoon of cinnamon in the crust
– Sprinkle with sugared cranberries for a festive garnish
Last Christmas, these were the hit of our family gathering. My cousin Amanda, who typically avoids desserts, had three pieces and asked for the recipe before leaving! The tartness of cranberries perfectly complements the sweet orange filling.
Summer Orange-Basil Bars
– Infuse 2 tablespoons fresh basil into the filling
– Add ¼ teaspoon vanilla to enhance the herbal notes
– Garnish with small basil leaves and powdered sugar
When I serve these at summer barbecues in my backyard, guests are initially surprised by the herb addition but quickly become converts. The aromatic basil brings out the floral notes in the orange in an unexpected way.
Flavor Combinations That Elevate Orange Bars
Beyond seasonal adaptations, certain flavor additions can transform basic orange bars into sophisticated desserts:
Coconut Orange Bars
– Add ½ cup toasted coconut to the crust
– Include 2 tablespoons coconut cream in the filling
– Sprinkle toasted coconut on top before serving
Ginger-Spiced Orange Bars
– Add 1 tablespoon fresh grated ginger to the filling
– Include ¼ teaspoon ground ginger in the crust
– Serve with a small scoop of ginger ice cream
Chocolate-Dipped Orange Bars
– Prepare bars according to the basic recipe
– Once chilled, dip half of each cut bar in melted dark chocolate
– Allow chocolate to set before serving
My neighbor Tom, who claims to dislike fruit desserts, became an instant convert after trying the chocolate-dipped version. “I never thought I’d say this about orange bars,” he told me, “but I could eat these every day!”
According to research from the USDA, combining citrus with complementary flavors not only enhances taste but can increase the bioavailability of certain nutrients—another great reason to get creative with your orange bars recipe.
Storage Tips and Serving Suggestions for Orange Bars
Orange bars maintain their best quality when stored properly, remaining fresh in the refrigerator for up to 5 days or frozen for 3 months. For optimal texture, serve them slightly chilled rather than cold from the refrigerator. While delicious on their own, orange bars can be elevated with thoughtful garnishes like candied orange peel, whipped cream, or complementary beverages that enhance their citrus profile.
I’ve learned through countless potlucks and family gatherings that proper storage and presentation can make a huge difference in how these treats are received. Even the perfect orange bars recipe can fall flat if the bars aren’t stored or served correctly.
How to Keep Orange Bars Fresh
The high moisture content in orange bars means proper storage is crucial:
1. Cool completely before storing to prevent condensation and sogginess.
2. Store in an airtight container with parchment paper between layers to prevent sticking.
3. Refrigerate for up to 5 days – the flavor actually improves after 24 hours as the orange notes deepen.
4. For longer storage, freeze for up to 3 months – wrap individual bars in plastic wrap, then place in freezer bags.
I’ve discovered that taking the bars out of the refrigerator about 15-20 minutes before serving yields the perfect temperature—cold enough to hold their shape but warm enough for the flavors to fully express themselves.
According to food safety guidelines from the FDA, desserts containing eggs should always be refrigerated below 40°F, making proper storage not just a matter of taste but safety as well.
Creative Presentation Ideas for Orange Bars
While these bars are delightful on their own, thoughtful presentation elevates them to dinner-party worthy:
For casual gatherings:
– Dust with powdered sugar just before serving
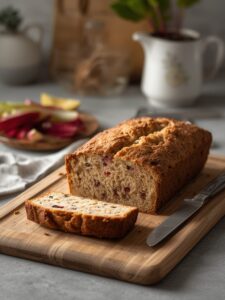
– Serve on a rustic wooden board with fresh orange slices
– Pair with coffee or tea in simple mugs
For special occasions:
– Garnish with candied orange peel and a sprig of mint
– Add a small dollop of lightly sweetened whipped cream
– Serve with a side of vanilla bean ice cream
– Accompany with small glasses of Grand Marnier or orange blossom tea
When hosting my cookbook club in my Asheville home, I often serve these bars with an orange-infused whipped cream that takes just minutes to prepare. Simply add a teaspoon of orange zest and a few drops of orange extract to heavy cream before whipping—it’s a small touch that makes guests feel special.
“Chloe’s orange bars were the highlight of our spring brunch,” my friend Jessica commented after I brought them to her garden party last year. “The bright flavor and pretty presentation made them feel special, but she swears they were simple to make. I’ve already requested them for our next gathering!”
Creating memorable food doesn’t always require complex techniques or rare ingredients. Sometimes, as with this orange bars recipe, the magic lies in taking simple, quality ingredients and presenting them with care. That philosophy has guided my cooking journey from my grandmother’s kitchen to my own—and it’s what I love sharing through WePostRecipes.