Disclaimer: This content is for educational purposes only, not medical advice. Always consult with a doctor before making significant changes to your diet, especially if you have pre-existing health conditions.

I still remember the first time I made a blueberry upside down cake in my tiny Asheville kitchen. The sweet aroma of caramelizing sugar and bursting blueberries filled the house as my grandmother watched over my shoulder. This blueberry upside down cake recipe brings back those cherished memories while offering a simple yet impressive dessert anyone can master. Whether you’re a baking novice or just looking for a foolproof way to showcase summer berries, this cake delivers both nostalgia and incredible flavor with minimal effort.
IN THIS ARTICLE
Key Takeaways: What You Need To Know
– Blueberry upside down cake combines caramelized fruit with a tender, moist cake base
– Fresh or frozen blueberries both work well in this recipe
– The secret to perfect texture is room temperature ingredients and careful mixing
– This cake keeps well for 2-3 days when properly stored
– Simple swaps can make this recipe dairy-free or gluten-free
The Magic of Blueberry Upside Down Cake Explained
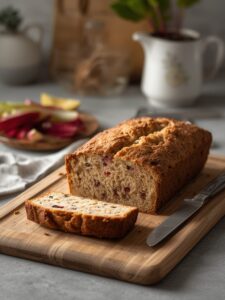
Blueberry upside down cake creates a perfect harmony between juicy fruit and tender cake. This classic dessert features a layer of caramelized blueberries that become the top of the cake when inverted after baking. The fruit releases its juices during baking, creating a natural sauce that infuses the cake with moisture and flavor.
Growing up in North Carolina, summer meant blueberry picking in the mountains followed by days of baking. My grandmother taught me that upside down cakes were actually designed for convenience, not complexity. Unlike fancy layer cakes, these one-pan wonders require no special decorating skills but still create that “wow” moment when turned out onto a serving plate.
What makes blueberry upside down cake particularly special is how the berries transform during baking. They soften and release their juices, creating a gorgeous purple-blue topping that’s both tart and sweet. The contrast with the buttery cake below is simply magical.
Why Are Upside Down Cakes So Popular?
Upside down cakes have stood the test of time for good reason. Their origins trace back to the early 20th century when they were cooked in cast iron skillets over open fires. The “upside down” method was practical—cooking the fruit on the bottom protected it from burning while creating a beautiful presentation when flipped.
These cakes gained massive popularity in the 1920s when the Dole Pineapple Company promoted pineapple upside down cake recipes. The technique works beautifully with countless fruits, but blueberries might be my favorite variation for their perfect balance of sweetness and acidity.
The genius of these cakes lies in their simplicity. You’re essentially making one batter and letting the fruit do all the decorative work. For new bakers especially, this means you can create something visually stunning without complicated techniques.
What Makes Blueberries Perfect for This Cake?
Blueberries offer several advantages for upside down cakes. First, their natural pectin content helps create that perfect jammy consistency when baked. Unlike some fruits that can become mushy, blueberries maintain enough structure to create distinct pockets of fruit throughout the topping.
Here in Asheville, our local blueberries have a distinctive sweet-tart balance that makes them ideal for baking. But don’t worry if you don’t have access to freshly picked berries—this recipe works beautifully with store-bought or even frozen blueberries, making it accessible year-round.
Essential Ingredients for Perfect Blueberry Upside Down Cake
The perfect blueberry upside down cake requires quality ingredients that work harmoniously together. Fresh or frozen blueberries form the star topping, while brown sugar and butter create a luscious caramel base. The cake itself uses simple pantry staples including flour, sugar, eggs, vanilla, and baking powder.
When I’m teaching new bakers, I always emphasize that ingredient quality matters tremendously in simple recipes like this. With relatively few components, each one plays an important role in the final result. Let’s break down what you’ll need:
For the blueberry topping:
– 2 cups fresh or frozen blueberries
– ½ cup brown sugar (light or dark)
– ¼ cup unsalted butter
– 1 tablespoon lemon juice
For the cake batter:
– 1½ cups all-purpose flour
– 1 teaspoon baking powder
– ¼ teaspoon salt
– ½ cup unsalted butter, softened
– 1 cup granulated sugar
– 2 large eggs, room temperature
– 1 teaspoon vanilla extract
– ½ cup milk
The quality of your blueberries will significantly impact the final cake. If using frozen, don’t thaw them first—they’ll release too much liquid too quickly. I’ve found that a mix of fresh and frozen actually creates an interesting texture variation in the topping.
Blueberry Upside Down Cake
Equipment
- 9-inch cake pan
- saucepan
- Mixing bowls
- electric mixer or whisk
- spatula
Ingredients
- 2 cups fresh or frozen blueberries
- 1/2 cup brown sugar
- 1/4 cup unsalted butter (for topping)
- 1 tbsp lemon juice
- 1 1/2 cups all-purpose flour
- 1 tsp baking powder
- 1/4 tsp salt
- 1/2 cup unsalted butter (softened)
- 1 cup granulated sugar
- 2 large eggs
- 1 tsp vanilla extract
- 1/2 cup milk
Instructions
- Preheat oven to 350°F (175°C) and prepare a 9-inch round cake pan.
- Melt butter in a saucepan, add brown sugar, and stir until dissolved. Remove from heat and stir in lemon juice.
- Pour the mixture into the pan and spread evenly, then arrange blueberries over the top.
- In a bowl, whisk together flour, baking powder, and salt.
- In another bowl, cream butter and sugar until light and fluffy.
- Add eggs one at a time, then mix in vanilla extract.
- Alternate adding dry ingredients and milk to the batter, mixing gently until combined.
- Spread batter over blueberries evenly without disturbing the layer.
- Bake for 40–45 minutes until a toothpick inserted comes out clean.
- Cool for 10 minutes, then carefully invert onto a serving plate.
Notes
Nutrition
Fresh vs. Frozen Blueberries: Which Should You Choose?
This question comes up in nearly every baking class I teach. The truth? Both fresh and frozen blueberries work wonderfully in this cake, but with slight differences in the final result.
Fresh blueberries:
– Maintain more distinct shape
– Create slightly less juice/sauce
– Offer brighter color
– Work best in summer when in season
Frozen blueberries:
– Release more juice during baking
– Create a more sauce-like topping
– May bleed color into the cake batter
– Available year-round
I typically use fresh berries during blueberry season when I can get them locally in Asheville. The rest of the year, I keep frozen wild blueberries on hand specifically for baking. They’re actually picked at peak ripeness and frozen immediately, often making them more flavorful than out-of-season “fresh” berries that have traveled long distances.
If using frozen, one tip I’ve learned over years of testing: toss them with a tablespoon of flour before arranging them in the pan. This helps absorb some excess moisture during baking.
Can You Substitute Any Ingredients?
Absolutely! Part of what makes this blueberry upside down cake so approachable is its flexibility. Here are some substitutions I’ve personally tested with success:
| Original Ingredient | Substitute Options |
|---|---|
| All-purpose flour | 1:1 gluten-free flour blend, whole wheat pastry flour (use 25% less) |
| Butter | Coconut oil, vegan butter |
| Milk | Almond milk, oat milk, buttermilk |
| Brown sugar | Coconut sugar, maple sugar |
For my friends with egg allergies, I’ve had success replacing each egg with either a flax egg (1 tablespoon ground flaxseed mixed with 3 tablespoons water) or ¼ cup unsweetened applesauce. The texture will be slightly different, but still delicious.
Step-by-Step Blueberry Upside Down Cake Recipe
Creating a perfect blueberry upside down cake involves three main stages: preparing the fruit topping, making the cake batter, and the crucial flip after baking. Start by arranging blueberries in a buttery brown sugar layer, then top with a simple vanilla cake batter. After baking until golden, cool slightly before carefully inverting onto a serving plate.
I’ve simplified this recipe after years of testing to make it foolproof even for beginners. The process breaks down into manageable steps that build on each other.
How Do You Prepare the Perfect Blueberry Topping?
The topping—which actually starts on the bottom of the pan—is where the magic begins. Here’s my tested method:
1. Preheat your oven to 350°F (175°C) and prepare a 9-inch round cake pan by spraying with non-stick spray.
2. In a small saucepan, melt ¼ cup butter over medium heat.
3. Add brown sugar and stir until dissolved, about 2 minutes.
4. Remove from heat and stir in lemon juice.
5. Pour this mixture into the prepared cake pan, spreading evenly.
6. Arrange blueberries in a single layer over the sugar mixture.
The lemon juice might seem like a small addition, but it serves an important purpose. It balances the sweetness while also helping preserve that vibrant blueberry color. When I skip this ingredient, the cake still tastes good but lacks that perfect sweet-tart balance.
Make sure your blueberries completely cover the bottom of the pan. Don’t be afraid to really pack them in—they’ll shrink slightly during baking. I like to add about 25% more berries than I think I need for the most dramatic presentation.
What’s the Secret to a Moist and Tender Cake Batter?
The cake portion needs to be substantial enough to support the fruit topping while remaining tender. After much experimentation, I’ve found this method delivers perfect results:
1. In a medium bowl, whisk together flour, baking powder, and salt.
2. In a large bowl, beat softened butter and granulated sugar until light and fluffy, about 3 minutes.
3. Add eggs one at a time, beating well after each addition.
4. Stir in vanilla extract.
5. Gradually add flour mixture alternating with milk, beginning and ending with flour (flour-milk-flour-milk-flour).
6. Carefully spread batter over blueberries without disturbing them.
The key to tenderness is in not overmixing. Once you add the flour, use gentle folding motions and stop as soon as the ingredients are incorporated. Overmixing develops gluten, which can make your cake tough rather than tender.
Room temperature ingredients also make a huge difference. I set my butter, eggs, and milk out at least 30 minutes before baking. When ingredients are the same temperature, they form an emulsion that traps air—this air expands during baking, giving your cake that perfect fluffy texture.

Baking Tips for Blueberry Upside Down Cake Success
Achieving blueberry upside down cake success requires attention to detail during baking. Use the right pan size (9-inch works best), and bake at 350°F until a toothpick inserted in the center comes out clean, typically 40-45 minutes. Allow the cake to cool for exactly 10 minutes before attempting to flip—too soon or too late can cause problems.
Through years of teaching cooking classes in my Asheville kitchen, I’ve identified the most common pitfalls that prevent bakers from achieving upside down cake perfection. Let me share what I’ve learned.
How Do You Know When Your Cake Is Done?
This might be the most critical question for any cake recipe. With blueberry upside down cake, traditional doneness tests need slight modification.
The standard toothpick test works well, but insert it into the cake portion only, avoiding the fruit layer. The toothpick should come out clean or with a few moist crumbs—not wet batter.
Visual cues are equally important:
– The edges should pull away slightly from the sides of the pan
– The top (which will become the bottom) should be golden brown
– The center should spring back when lightly pressed with a fingertip
I’ve found that baking time can vary based on several factors including:
– Your oven’s calibration (use an oven thermometer for accuracy)
– The moisture content of your blueberries
– The exact dimensions of your cake pan
– The material of your cake pan (glass vs. metal)
Start checking for doneness at the 35-minute mark, but don’t be surprised if it takes the full 45 minutes. Underbaking is one of the most common mistakes—the center needs to be fully set for successful flipping.
What’s the Perfect Technique for Flipping the Cake?
The moment of truth for any upside down cake is the flip! Here’s my foolproof method:
1. Remove the cake from the oven and place on a cooling rack.
2. Set a timer for 10 minutes—this is crucial! Too short and the cake may fall apart; too long and the caramel may harden, causing the cake to stick.
3. Run a butter knife around the edge to loosen any stuck areas.
4. Place your serving plate upside down on top of the cake pan.
5. Using oven mitts, firmly grip both the plate and pan together.
6. In one confident motion, flip everything over.
7. Wait 30 seconds, then slowly lift the pan away.
If any fruit pieces stick to the pan, simply scrape them off and arrange them back on the cake. No one will know!
One trick I learned from a professional baker: place a piece of parchment paper cut to fit in the bottom of your pan before adding the caramel mixture. This creates insurance against sticking, though I rarely find it necessary if the timing is right.
Serving and Storing Your Blueberry Upside Down Cake
Blueberry upside down cake is best served warm or at room temperature within 1-2 days of baking. For the perfect presentation, allow it to cool for at least 30 minutes before slicing. Store covered at room temperature for up to 2 days, or refrigerate for 3-4 days. Freezing is possible but may affect the texture of the fruit topping.
One of the best qualities of this cake is its versatility in serving. It works equally well as a casual weeknight dessert or an impressive finale to a dinner party. Let me share some serving tips I’ve gathered over years of baking.
What Are the Best Ways to Serve Blueberry Upside Down Cake?
While delicious on its own, this cake reaches new heights with thoughtful accompaniments. Here are my favorite serving suggestions:
1. Slightly warm (about 10 seconds in the microwave if made ahead) with a scoop of vanilla ice cream
2. At room temperature with lightly sweetened whipped cream
3. With a dollop of crème fraîche for a tangy contrast
4. Alongside a small glass of dessert wine like Sauternes or late-harvest Riesling
5. With a sprinkle of fresh blueberries on top for visual appeal and textural contrast
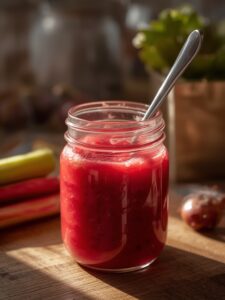
When serving for guests, I often create a simple sauce by warming additional blueberries with a splash of maple syrup and lemon juice. This elevates the presentation while intensifying the blueberry flavor.
For portion sizing, this cake easily serves 8-10 people. Use a sharp knife and clean it between slices for the neatest presentation. I find slightly warm cake cuts more cleanly than cold cake.
How Long Does Blueberry Upside Down Cake Stay Fresh?
Understanding proper storage is key to enjoying this cake at its best quality. Here’s my guidance based on years of testing:
| Storage Method | Maximum Freshness Period | Notes |
|---|---|---|
| Room temperature | 1-2 days | Cover with cake dome or plastic wrap |
| Refrigerator | 3-4 days | Cover tightly; bring to room temperature before serving |
| Freezer | 1-2 months | Wrap in plastic, then foil; thaw in refrigerator |
The cake’s texture changes slightly with each storage method. At room temperature, it maintains the ideal balance between moist cake and jammy fruit. Refrigeration firms the texture somewhat but helps prevent spoilage. Freezing works in a pinch but can make the fruit topping slightly watery upon thawing.
One tip I’ve discovered: if storing for more than a day, place wax paper directly on any cut edges to prevent them from drying out. This small step makes a significant difference in maintaining freshness.
Variations and Creative Twists on Blueberry Upside Down Cake
Blueberry upside down cake serves as an excellent base for creative variations. Try mixed berry combinations (blueberries with raspberries or blackberries), add citrus zest or spices to the batter, or experiment with alternative flours for different flavors and textures. The basic technique remains the same while offering endless customization possibilities.
After making this cake dozens of times, I’ve discovered some delightful variations that keep it exciting. Here are some of my tested favorites that maintain the soul of the original while offering something new.
Can You Add Other Fruits to Blueberry Upside Down Cake?
Absolutely! While pure blueberry has a special place in my heart, mixed fruit versions create stunning visual impact and complex flavors. Some winning combinations I’ve tried:
– Blueberry and peach: Arrange sliced peaches around the edge with blueberries filling the center
– Blueberry and lemon: Add thin lemon slices between blueberries for bright citrus notes
– Triple berry delight: Equal parts blueberries, raspberries, and blackberries
– Blueberry and apple: Thinly sliced apples with blueberries and a dash of cinnamon
– [Blueberry and pear](https://wepostrecipes.com/pear-recipes/): The subtle sweetness of pear complements the more assertive blueberries
When mixing fruits, consider their moisture content and cooking times. Berries generally work well together, but when adding firmer fruits like apples, I recommend pre-cooking them slightly (about 2 minutes in the microwave) before adding to the topping.
For an especially dramatic presentation, arrange the fruit in concentric circles or other patterns. The extra minute of effort pays off in “wow factor” when the cake is flipped.
How Can You Make This Cake Your Own?
Beyond fruit variations, there are countless ways to personalize this recipe:
For the topping:
– Add 1/2 teaspoon cinnamon or cardamom to the caramel mixture
– Sprinkle 1/4 cup chopped nuts (pecans or walnuts work beautifully) between the caramel and berries
– Use maple syrup instead of brown sugar for a different flavor profile
– Add 1 tablespoon of bourbon or dark rum to the caramel for sophisticated flavor
For the cake batter:
– Substitute almond extract for vanilla (use half the amount)
– Add 1-2 tablespoons of lemon, orange, or lime zest
– Fold in 1/4 cup of quick-cooking oats for texture
– Replace 1/4 cup of flour with ground almonds for a nutty flavor
– Add 1/2 teaspoon of lavender or 1/4 teaspoon of cardamom
I developed a holiday version last winter using frozen blueberries with orange zest and a touch of allspice in the batter. It was a refreshing alternative to heavier seasonal desserts and reminded everyone of warmer days ahead.
My friend Sarah tried this recipe with a gluten-free flour blend and coconut sugar instead of brown sugar. She reported: “The cake turned out amazing! My gluten-sensitive daughter was thrilled to have dessert everyone could enjoy, and no one could tell it was modified.”
Troubleshooting Common Blueberry Upside Down Cake Problems
When making blueberry upside down cake, common issues include soggy centers, sticking during flipping, or dry cake texture. These problems typically stem from incorrect baking time, improper cooling before flipping, or overmixing the batter. With simple adjustments to technique, these issues can be easily resolved for perfect results every time.
Even experienced bakers encounter challenges occasionally. Through teaching cooking classes in Asheville, I’ve helped hundreds of home cooks troubleshoot their cake issues. Here are solutions to the most common problems.
Why Did My Cake Turn Out Soggy in the Middle?
A soggy center is usually caused by one of these factors:
1. Underbaking: The most common culprit. Even if the top looks done, the center may need more time. Use a toothpick to check, and don’t hesitate to add 5-7 minutes if needed.
2. Too much moisture from berries: If using frozen berries, they release more liquid. Toss them with 1 tablespoon of flour before arranging in the pan to absorb excess moisture.
3. Incorrect oven temperature: Many home ovens run 25°F cooler than their settings indicate. An inexpensive oven thermometer can verify your actual temperature.
4. Opening the oven door too often: Each peek drops the temperature significantly. Try to limit checks to once near the end of baking time.
For my high-altitude friends (a concern in the Asheville mountains), you might need to increase the oven temperature by 25°F and reduce sugar by 1-2 tablespoons to avoid sogginess.
What If Your Cake Sticks to the Pan When Flipping?
The dramatic flip is where things can go wrong, but these solutions help ensure success:
1. Timing is everything: The 10-minute cooling period is crucial—set a timer! Too short and the cake is fragile; too long and the caramel hardens.
2. Pan preparation: Use a well-greased pan. For extra insurance, line the bottom with parchment paper before adding the caramel mixture.
3. Loosen thoroughly: Run a thin knife or offset spatula around the edge AND gently under the bottom edge before flipping.
4. Quick recovery: If some fruit sticks to the pan, simply scrape it off and place it back on the cake while still warm.
5. Non-stick insurance: If you’ve had sticking problems in the past, try using a silicone cake pan or a very well-seasoned cast iron skillet instead of a traditional cake pan.
One of my cooking class students, Michael, had persistent sticking issues until we discovered his “non-stick” pan had lost its coating. With a new pan, his next cake released perfectly. Sometimes the simplest explanation is the correct one!
With these troubleshooting tips and the detailed recipe above, you’re well-equipped to create a stunning blueberry upside down cake that will impress family and friends. The combination of caramelized blueberries and tender cake makes for a dessert that feels special while remaining deliciously approachable—exactly the kind of recipe I love to share from my Asheville kitchen to yours.