Disclaimer: This content is for educational purposes only, not medical advice. Always consult with a doctor before making significant changes to your diet, especially if you have pre-existing health conditions.

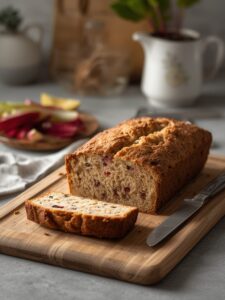
Growing up in the mountains of Asheville, summer gatherings always called for something special yet simple. My peanut butter icebox cake became that perfect no-fuss dessert that had everyone asking for seconds. This peanut butter icebox cake combines crispy graham crackers, creamy peanut butter filling, and a chocolate drizzle that creates magic as it chills in your refrigerator.
IN THIS ARTICLE
Key Takeaways: What You Need To Know
- This peanut butter icebox cake requires zero baking – perfect for hot summer days
- Preparation takes only 20 minutes plus chilling time
- Uses simple pantry ingredients most home cooks already have
- Can be made up to 48 hours in advance of serving
- The recipe serves 8-10 people and stores well for up to 5 days
What Makes a Perfect Peanut Butter Icebox Cake?
A perfect peanut butter icebox cake transforms simple ingredients into a dessert that tastes like you spent hours in the kitchen. The magic happens during chilling, when graham crackers soften to a cake-like texture as they absorb moisture from the creamy peanut butter layers.
Why Is This No-Bake Dessert So Popular?
Icebox cakes gained popularity during the 1930s as refrigerators became common household appliances. These desserts offered a way to create impressive treats without heating up the kitchen. The peanut butter version brings together America’s favorite flavor combination—peanut butter and chocolate—in a dessert that’s both nostalgic and modern.
How Does the Layering Process Work?
The science behind icebox cakes is fascinating. When you layer crisp graham crackers with creamy peanut butter mixture, the moisture from the filling gradually softens the crackers. After several hours in the refrigerator, those distinct layers meld together, creating a texture that’s remarkably similar to traditional cake but requires no baking whatsoever.
Ingredients You’ll Need for Your Peanut Butter Icebox Cake
To make this peanut butter icebox cake, you’ll need ingredients that balance sweetness, texture, and that irresistible peanut butter flavor. Most ingredients are pantry staples, making this an excellent dessert option when you need something impressive without a special shopping trip.
What Are the Essential Components?
For the base of your peanut butter icebox cake, gather these key ingredients:
- 2 cups heavy whipping cream
- 8 oz cream cheese, softened
- 1 cup creamy peanut butter (I recommend using regular, not natural style)
- 1 cup powdered sugar
- 2 teaspoons vanilla extract
- 3 sleeves graham crackers (approximately 27 crackers)
- ½ cup chocolate chips for ganache topping
- ¼ cup heavy cream for ganache topping
Can I Make Substitutions for Dietary Restrictions?
Absolutely! This peanut butter icebox cake can be adapted to accommodate various dietary needs:
- For a lighter version: Substitute Neufchâtel cheese for cream cheese (saves about 30% of the fat)
- Gluten-free option: Use gluten-free graham crackers or cookies
- Dairy-free alternative: Replace heavy cream with full-fat coconut cream (chilled overnight) and use dairy-free cream cheese
- Natural peanut butter: While I prefer regular peanut butter for consistency, natural peanut butter works if thoroughly stirred before measuring
According to Wikipedia, peanut butter contains protein, healthy fats, and other nutrients that make this treat more than just delicious—it offers some nutritional benefits too!
Step-by-Step Instructions for Peanut Butter Icebox Cake

Peanut Butter Icebox Cake
Equipment
- Mixing bowls
- electric mixer
- spatula
- 9×13 inch baking dish
- saucepan or microwave-safe bowl
Ingredients
- 2 cups heavy whipping cream
- 8 oz cream cheese, softened
- 1 cup creamy peanut butter
- 1 cup powdered sugar
- 2 tsp vanilla extract
- 27 graham crackers
- 1/2 cup chocolate chips
- 1/4 cup heavy cream (for ganache)
Instructions
- In a large bowl, beat heavy cream until stiff peaks form.
- In another bowl, beat cream cheese and peanut butter until smooth.
- Add powdered sugar and vanilla extract to the peanut butter mixture and beat until combined.
- Gently fold the whipped cream into the peanut butter mixture until smooth and fluffy.
- Spread a thin layer of filling on the bottom of a 9×13-inch dish.
- Add a layer of graham crackers, then spread a portion of the peanut butter filling over them.
- Repeat layering graham crackers and filling until all ingredients are used, ending with filling on top.
- Heat heavy cream for ganache and pour over chocolate chips. Stir until smooth.
- Drizzle ganache over the top of the cake.
- Cover and refrigerate for at least 4 hours or overnight before serving.
Notes
Nutrition
Creating this peanut butter icebox cake is surprisingly simple. The process involves preparing your peanut butter filling, layering with graham crackers, and allowing time for the magic of refrigeration to transform everything into a sliceable, cake-like dessert.
How Do You Prepare the Peanut Butter Filling?
The peanut butter filling is the heart of this dessert, providing both structure and flavor. Follow these steps for perfect results:
1. In a large mixing bowl, beat 2 cups heavy cream until stiff peaks form (about 3-4 minutes)
2. In a separate bowl, beat softened cream cheese and peanut butter until completely smooth
3. Add powdered sugar and vanilla extract to the peanut butter mixture, beating until fully incorporated
4. Gently fold the whipped cream into the peanut butter mixture using a rubber spatula, maintaining as much air as possible
5. Continue folding until no white streaks remain, but be careful not to deflate the mixture
What’s the Best Layering Technique?
The layering process creates the distinctive look and texture of peanut butter icebox cake:
| Layer | Component |
|---|---|
| Base layer | Thin spread of peanut butter filling |
| First layer | Graham crackers in single layer |
| Second layer | ⅓ of remaining peanut butter filling |
| Third layer | Graham crackers |
| Fourth layer | ⅓ of remaining peanut butter filling |
| Fifth layer | Graham crackers |
| Top layer | Final ⅓ of peanut butter filling |
| Garnish | Chocolate ganache drizzle |
Creative Variations for Your Peanut Butter Icebox Cake
The beauty of this peanut butter icebox cake lies in its versatility. Once you master the basic recipe, you can experiment with different flavors, textures, and presentations to create your own signature version.
What Flavors Pair Well With Peanut Butter?
Peanut butter is incredibly versatile and pairs beautifully with numerous complementary flavors:
- Banana boost: Add thinly sliced bananas between layers for a peanut butter-banana combo
- Berry bliss: Include a layer of strawberry or raspberry jam for a PB&J-inspired treat
- Chocolate lover’s dream: Mix mini chocolate chips into the peanut butter filling
- Caramel craze: Drizzle caramel sauce between layers along with a sprinkle of sea salt
- Coffee infusion: Add 1 tablespoon of instant espresso powder to the filling for a mocha twist
How Can I Present This Dessert for Special Occasions?
Transform this humble peanut butter icebox cake into a showstopper with these presentation ideas:
- Individual servings: Build in clear glass trifle dishes for elegant individual portions
- Chocolate garnishes: Add chocolate curls, crushed peanut butter cups, or chocolate-covered peanuts
- Decorative drizzles: Create patterns with alternating chocolate and peanut butter drizzles
- Cookie crumb border: Press crushed cookies around the sides for texture and visual appeal
- Whipped cream piping: Add decorative whipped cream dollops around the edge before serving
Tips for Making Peanut Butter Icebox Cake Ahead of Time
One of the greatest advantages of peanut butter icebox cake is its make-ahead potential. This dessert actually improves with time as flavors meld and textures develop, making it perfect for busy hosts or anyone who likes to plan ahead.
What’s the Ideal Timeline for Preparation?
The peanut butter icebox cake needs time to set properly, so timing is important:
- Minimum chill time: At least 4 hours, but the texture improves dramatically with longer chilling
- Ideal preparation: Make 12-24 hours before serving for optimal texture and flavor development
- Maximum advance preparation: Can be made up to 48 hours ahead and kept refrigerated
- Serving timeline: Remove from refrigerator 10-15 minutes before serving for the best texture and flavor
My neighbor Sarah tried this recipe for her daughter’s birthday party: “I made the peanut butter icebox cake the day before, and it was a lifesaver! Not only did I avoid day-of stress, but the texture was absolutely perfect by the time we served it. The kids and adults both devoured it!”
How Should I Store Leftovers?
Proper storage ensures your peanut butter icebox cake maintains its quality:
- Cover tightly: Use plastic wrap pressed directly against any exposed edges to prevent drying
- Refrigeration: Always keep refrigerated between servings
- Serving portions: Consider cutting into individual portions before storing for easier serving later
- Freezing option: Can be frozen for up to 1 month; thaw overnight in refrigerator before serving
- Quality timeline: Best enjoyed within 5 days of preparation
I often make this peanut butter icebox cake for my weekly Sunday family gatherings in Asheville. The beauty of it is that I can prepare it Friday evening, and it’s perfectly set for Sunday afternoon dessert—one less thing to worry about when hosting!
This no-bake peanut butter icebox cake has become my go-to solution for effortless entertaining, proving that sometimes the simplest recipes create the most memorable experiences at the table.