Disclaimer: This content is for educational purposes only, not medical advice. Always consult with a doctor before making significant changes to your diet, especially if you have pre-existing health conditions.

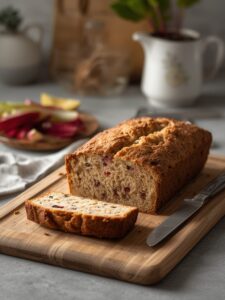
I still remember the first strawberry cobbler I baked in my tiny Asheville kitchen. The sweet aroma of bubbling berries filled our home while thunderstorms rolled through the Blue Ridge Mountains outside. That strawberry cobbler recipe became my go-to summer dessert, combining fresh local berries with a buttery, biscuit-like topping that’s rustic and incredibly satisfying. Today, I’m sharing this treasured recipe that brings together simplicity and flavor in perfect harmony.
IN THIS ARTICLE
Key Takeaways: What You Need To Know
A perfect strawberry cobbler combines fresh, juicy berries with a simple buttery topping. This recipe requires minimal preparation (under 15 minutes) with just 8 basic ingredients. The secret lies in allowing strawberries to macerate with sugar before baking. Your cobbler should be bubbly around the edges with a golden-brown topping when done. Serve warm with vanilla ice cream or whipped cream for the ultimate experience.
What Makes a Classic Strawberry Cobbler Recipe Special?
A traditional strawberry cobbler recipe transforms simple ingredients into a dessert that feels like summer in every bite. Unlike fussy pastries, cobblers welcome imperfection and celebrate the natural beauty of fresh fruit.
My strawberry cobbler recipe balances sweet-tart berries with a buttery, biscuit-like topping that soaks up the fruit juices while remaining delightfully crisp on top. The beauty lies in its rustic presentation and unforgettable flavor that reminds me of those long summer evenings on my grandmother’s porch in North Carolina.
Why Is Strawberry Cobbler a Perfect Beginner Dessert?
Strawberry cobbler is incredibly forgiving for new bakers. Unlike precision-focused desserts, cobbler embraces rustic charm and actually improves with a homemade touch. The preparation involves simple steps: mix berries with sugar, prepare an easy drop batter, and let the oven do the work. No special equipment or techniques required—just basic mixing, measuring, and a hot oven.
When Is the Best Time to Make Strawberry Cobbler?
The ideal time to make strawberry cobbler is during late spring and early summer when strawberries reach their peak sweetness. In Asheville, this typically means May through early June, when local farmers markets overflow with ruby-red berries bursting with natural sugar and flavor. However, you can make this cobbler year-round using frozen berries when fresh aren’t available—just add 5 minutes to the baking time and expect a slightly juicier result.
Ingredients You’ll Need for the Perfect Strawberry Cobbler
Creating a memorable strawberry cobbler begins with selecting the right ingredients. Quality matters, especially with the star of the show—the strawberries.
For my strawberry cobbler recipe, I prioritize fresh, ripe berries when possible, but don’t hesitate to use frozen when fresh aren’t at their peak. The remaining ingredients are pantry staples you likely already have on hand, making this an accessible dessert for impromptu gatherings or family dinners.
What Strawberries Work Best for Cobbler?
The best strawberries for cobbler are fully ripe with deep red color throughout. Look for berries that are fragrant and firm but not hard. Avoid strawberries with white shoulders or hollow centers as they lack flavor. For optimal results, I recommend using locally grown berries when in season, as they’re picked closer to ripeness than commercially shipped varieties.
If using frozen strawberries, select whole frozen berries rather than sliced, and don’t thaw them before adding to your cobbler. The slow thawing during baking helps maintain the fruit’s structure and prevents excessive liquid.
How to Prepare Your Baking Dish for Cobbler Success?
Properly preparing your baking dish ensures your strawberry cobbler bakes evenly and releases easily. For best results, use an 8×8 inch or 9×9 inch baking dish. Ceramic or glass dishes distribute heat evenly, creating that desirable crisp edge while maintaining a tender center.
Always coat your baking dish thoroughly with butter or cooking spray before adding ingredients. For extra insurance against sticking (and added flavor), consider dusting the greased dish with a tablespoon of granulated sugar, creating a subtle sweet crust around the edges of your cobbler.
| Ingredient | Measurement |
|---|---|
| Fresh strawberries, hulled and halved | 4 cups (about 2 pounds) |
| Granulated sugar (for filling) | 3/4 cup |
| Cornstarch | 2 tablespoons |
| Lemon juice | 1 tablespoon |
| All-purpose flour | 1 cup |
| Baking powder | 1 tablespoon |
| Salt | 1/4 teaspoon |
| Unsalted butter, melted | 6 tablespoons |
| Milk (whole preferred) | 1/2 cup |
| Vanilla extract | 1 teaspoon |
| Sugar for topping (optional) | 1 tablespoon |
Step-by-Step Instructions for Baking Strawberry Cobbler
Strawberry Cobbler Recipe
Equipment
- 8×8 inch baking dish
- Mixing bowls
- whisk
- Spoon
- Measuring cups and spoons
Ingredients
- 4 cups fresh strawberries, hulled and halved
- 3/4 cup granulated sugar
- 2 tbsp cornstarch
- 1 tbsp lemon juice
- 1 cup all-purpose flour
- 1 tbsp baking powder
- 1/4 tsp salt
- 1/4 cup granulated sugar (for topping batter)
- 6 tbsp unsalted butter, melted
- 1/2 cup milk
- 1 tsp vanilla extract
- 1 tbsp coarse sugar (optional topping)
Instructions
- Preheat oven to 375°F (190°C) and grease an 8×8-inch baking dish.
- In a large bowl, combine strawberries, sugar, cornstarch, and lemon juice. Toss gently and let sit for 10–15 minutes.
- Transfer strawberry mixture into the prepared baking dish.
- In a bowl, whisk together flour, baking powder, salt, and sugar.
- In another bowl, mix melted butter, milk, and vanilla extract.
- Combine wet and dry ingredients to form a batter, mixing just until combined.
- Drop spoonfuls of batter over the strawberries, leaving gaps for fruit to show through.
- Sprinkle coarse sugar over the top if desired.
- Bake for 40–45 minutes until topping is golden and filling is bubbly.
- Cool for 15–20 minutes before serving.
Notes
Nutrition
Creating a perfect strawberry cobbler involves just a few straightforward steps that allow the natural flavors of the berries to shine. The process balances minimal hands-on time with maximum flavor results.
Begin by preheating your oven to 375°F (190°C) and properly preparing your baking dish. The entire preparation process takes less than 15 minutes, with the oven doing most of the work for the next 40-45 minutes while your kitchen fills with the irresistible aroma of baking strawberries.
How Do You Prepare the Strawberry Filling?
The filling is where the magic begins in any strawberry cobbler recipe. Start with fresh berries at room temperature for maximum flavor development. In a large bowl, combine 4 cups hulled and halved strawberries with 3/4 cup granulated sugar, 2 tablespoons cornstarch, and 1 tablespoon fresh lemon juice. Gently toss until berries are evenly coated.
Allow this mixture to sit for 10-15 minutes while you prepare the topping. This resting period, called maceration, encourages the berries to release their juices and blend with the sugar and cornstarch. Pour the berry mixture into your prepared baking dish, including all the accumulated juices.
What’s the Secret to a Perfect Cobbler Topping?
The ideal cobbler topping strikes a balance between tender and crisp with a hint of sweetness. In a medium bowl, whisk together 1 cup all-purpose flour, 1 tablespoon baking powder, 1/4 teaspoon salt, and 1/4 cup granulated sugar.
In a separate small bowl, combine 6 tablespoons melted butter, 1/2 cup milk, and 1 teaspoon vanilla extract. Pour the wet ingredients into the dry ingredients and stir just until combined – overmixing will create a tough topping.
Using a spoon, drop the batter in dollops over the strawberry filling, leaving some gaps for the fruit to bubble through. Sprinkle the top with 1 tablespoon coarse sugar for extra crunch and sparkle. Bake at 375°F for 40-45 minutes until the topping is golden brown and the filling is bubbling around the edges.
Serving and Storing Your Homemade Strawberry Cobbler
The moment your strawberry cobbler emerges from the oven, golden and bubbling, is just the beginning of the experience. How you serve and store this delicious dessert significantly impacts its enjoyment and longevity.
For optimal enjoyment, allow your cobbler to cool for about 15-20 minutes before serving. This cooling period allows the filling to set slightly while still maintaining that wonderful warmth that makes cobbler so comforting.
What Are the Best Ways to Serve Strawberry Cobbler?
Strawberry cobbler shines when served warm with complementary accompaniments. My favorite way to enjoy this dessert is with a scoop of high-quality vanilla ice cream that slowly melts into the warm cobbler, creating a creamy sauce that mingles with the berry juices. The temperature contrast between warm cobbler and cold ice cream creates a sensory experience that elevates the dessert.
For a lighter option, freshly whipped cream with just a touch of vanilla makes a beautiful topping. Or embrace simplicity and serve it as is, perhaps with a light dusting of powdered sugar for visual appeal. For brunch occasions, I’ve even been known to serve small portions of cobbler with a dollop of Greek yogurt.
How Long Does Strawberry Cobbler Stay Fresh?
Properly stored strawberry cobbler maintains its quality for 3-4 days. Once your cobbler has completely cooled, cover the baking dish with plastic wrap or transfer leftovers to an airtight container. Store in the refrigerator rather than at room temperature to prevent spoilage due to the fruit content.
To reheat individual servings, microwave for 20-30 seconds or until just warm. For a more authentic “fresh-baked” experience, reheat larger portions in a 300°F oven for 10-15 minutes. This gentle reheating revives the crisp texture of the topping while warming the filling.
Variations and Tips for Strawberry Cobbler Success
While classic strawberry cobbler is perfect on its own, countless variations can adapt this recipe to your taste preferences or available ingredients. My years of cobbler-making have taught me that this dessert welcomes creativity while still honoring tradition.
The versatility of cobbler makes it an ideal canvas for seasonal adaptations and personal touches. Whether you’re accommodating dietary restrictions or simply wanting to experiment with flavors, these variations maintain the soul of strawberry cobbler while offering exciting new dimensions.
How Can You Customize Your Strawberry Cobbler Recipe?
Customizing your strawberry cobbler allows you to create a signature dessert that reflects your personal taste. Consider these delicious variations:
- Add complementary fruits: Mix 1 cup of rhubarb with your strawberries for a classic spring pairing
- Incorporate warm spices: Add 1/2 teaspoon cinnamon or 1/4 teaspoon cardamom to the filling for depth
- Infuse with herbs: Mix 1 tablespoon fresh basil or 1 teaspoon fresh thyme into the berry filling for a sophisticated twist
- Make it nutty: Add 1/3 cup sliced almonds or chopped pecans to the topping for crunch
- Add citrus notes: Include 1 tablespoon orange zest in the berry mixture for brightness
For dietary adaptations, substitute the all-purpose flour with a 1:1 gluten-free baking blend, or replace the butter with coconut oil for a dairy-free version. The forgiving nature of cobbler makes it amenable to these substitutions without sacrificing quality.
What Are Common Mistakes to Avoid When Making Strawberry Cobbler?
After years of making strawberry cobbler in my Asheville kitchen, I’ve encountered (and overcome) the most common pitfalls. Avoid these mistakes for cobbler success:
- Skipping the cornstarch: Without a thickening agent, your filling will be too runny
- Overworking the topping batter: This develops gluten and results in a tough, dense crust instead of a tender one
- Spreading the topping too evenly: Cobbler should have an uneven, “cobbled” appearance that allows fruit to bubble through
- Opening the oven repeatedly: This drops the temperature and extends baking time, potentially drying out your cobbler
- Serving immediately from the oven: Very hot cobbler will be too runny; allow 15-20 minutes of cooling time for the perfect consistency
Real Stories: Strawberry Cobbler Memories from Our Community
The true measure of a recipe’s success isn’t just in its technique or ingredients—it’s in the memories it creates around dining tables and during special occasions. My strawberry cobbler recipe has traveled beyond my Asheville kitchen to homes across the country, creating new traditions and sweet memories for families everywhere.
These shared experiences reinforce what I’ve always believed: simple, approachable recipes create the foundation for meaningful food memories. The accessibility of cobbler makes it particularly powerful in bringing people together.
What Do Home Bakers Say About This Strawberry Cobbler Recipe?
The feedback from home bakers who’ve tried this strawberry cobbler recipe confirms its appeal across skill levels:
“I’ve never been confident in the kitchen, but Chloe’s strawberry cobbler turned out perfectly on my first try. My kids now request it every Sunday during strawberry season.” – Rebecca from Ohio
“As someone who grew up in the South, I’m particular about my cobblers. This recipe takes me right back to my grandmother’s kitchen—simple, not too sweet, and lets the berries shine.” – Marcus from Georgia
“I adapted this for my gluten-free daughter using a 1:1 baking blend, and nobody could tell the difference! It’s become our go-to dessert for family gatherings.” – Stephanie from California
These testimonials highlight what makes this recipe special—it’s adaptable, approachable, and consistently delivers that homemade charm that makes dessert meaningful. The simplicity of the preparation means even kitchen novices can create something that tastes like it came from an experienced baker’s oven.
Whether you’re making this cobbler for a weeknight family dessert or a special gathering, the rustic nature of this strawberry cobbler recipe invites connection and creates opportunities for new food memories to form around your table—just as it has around mine in Asheville for all these years.