Disclaimer: This content is for educational purposes only, not medical advice. Always consult with a doctor before making significant changes to your diet, especially if you have pre-existing health conditions.

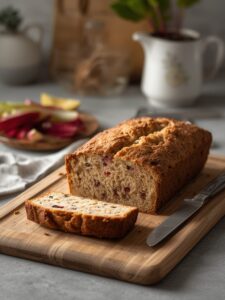
Growing up in Asheville, summer always meant abundant fresh fruit, and pineapple was a special treat in our household. My first attempt at making pineapple bars happened when I was just 15 – I remember standing in my grandmother’s kitchen, nervously measuring ingredients while she patiently guided me through each step. Today, this pineapple bars recipe remains one of my most requested treats when family visits. The perfect balance of tangy pineapple and buttery crust creates a dessert that’s impressive yet surprisingly simple to make.
IN THIS ARTICLE
Key Takeaways: What You Need To Know
– These pineapple bars combine a buttery shortbread crust with a sweet-tart pineapple filling
– Total prep and cooking time is just 45 minutes, plus cooling
– No special equipment needed – just basic mixing bowls and a standard baking pan
– Bars can be stored for up to 4 days in the refrigerator
– Perfect for beginners and experienced bakers alike
What Makes This Pineapple Bars Recipe Special?
These pineapple bars combine the tropical sweetness of fresh pineapple with a buttery, tender crust that melts in your mouth. The contrast between the crisp base and the luscious fruit topping creates a dessert that’s both refreshing and satisfying.
I’ve tested countless variations of this pineapple bars recipe over the years, tweaking ingredients and techniques until reaching this foolproof version. What sets these bars apart is their perfect balance – not too sweet, with the natural acidity of pineapple shining through against the rich, buttery crust.
Why Are Homemade Pineapple Bars Better Than Store-Bought?
Homemade pineapple bars outshine store-bought versions because you control the quality and freshness of ingredients. Most commercial pineapple bars contain preservatives and artificial flavors that mask the natural pineapple taste.
When I make this pineapple bars recipe at home, I notice how the genuine pineapple flavor comes through beautifully. My nephew Mark, who typically refuses anything with fruit, devours these bars and always asks for seconds. The fresh ingredients make an unmistakable difference in both flavor and texture.
Can I Make These Pineapple Bars Year-Round?
You can absolutely make these delicious pineapple bars any time of year. While fresh pineapples are at their peak during spring and summer, this versatile recipe works wonderfully with canned pineapple when fresh isn’t available.
During winter months in chilly Asheville, I often prepare these pineapple bars as a reminder of warmer days. The tropical aroma that fills your kitchen while baking is an instant mood lifter. I find using high-quality canned pineapple (packed in juice, not syrup) gives excellent results when fresh isn’t an option.
Ingredients You’ll Need For Perfect Pineapple Bars
Gathering the right ingredients is crucial for creating the best pineapple bars. This recipe uses pantry staples combined with fresh (or canned) pineapple for an accessible yet impressive dessert.
For the best pineapple bars recipe results, make sure all refrigerated ingredients reach room temperature before you begin. This ensures proper incorporation and helps achieve that perfect texture I’ve refined through years of testing.
What Type of Pineapple Works Best for These Bars?
The pineapple you choose significantly impacts the final flavor of your bars. For optimal results in this pineapple bars recipe, look for these characteristics:
– Fresh pineapple: Choose one that smells sweet at the base and has golden-yellow color showing between the eyes
– Canned pineapple: Select chunks or crushed pineapple packed in 100% juice (not syrup)
– Frozen pineapple: Thaw completely and drain excess liquid before using
When I teach cooking classes in Asheville, students often ask about pineapple selection. I always recommend the “sniff test” – a ripe pineapple should have a sweet, tropical aroma at the base. If it doesn’t smell like anything, it won’t taste like much either.
Essential Baking Equipment for Pineapple Bars
One thing I love about this pineapple bars recipe is that it doesn’t require fancy equipment. As someone who believes in accessible cooking, I’ve intentionally kept the tools simple:
| Equipment | Purpose |
|---|---|
| 9×13 inch baking pan | Perfect size for even baking and proper thickness |
| Mixing bowls (medium and large) | For preparing crust and filling separately |
| Measuring cups and spoons | For accurate ingredient portions |
| Rubber spatula | For folding ingredients and scraping bowls |
I still use my grandmother’s well-worn mixing bowls when making these bars. She always said good cooking doesn’t need fancy tools – just attention to detail and quality ingredients.
Step-By-Step Instructions For Pineapple Bars
Pineapple Bars
Equipment
- 9×13 inch baking pan
- Mixing bowls
- saucepan
- spatula
- Measuring cups and spoons
Ingredients
- 2 cups all-purpose flour
- 1/2 cup granulated sugar
- 1/4 tsp salt
- 1 cup unsalted butter, cold and cubed
- 2 cups pineapple, finely chopped or crushed (drained)
- 3/4 cup granulated sugar
- 3 tbsp cornstarch
- 2 tbsp lemon juice
- 1 tsp vanilla extract
Instructions
- Preheat oven to 350°F (175°C) and line a 9×13-inch baking pan with parchment paper.
- In a large bowl, combine flour, sugar, and salt. Cut in cold butter until mixture resembles coarse crumbs.
- Press mixture evenly into the prepared pan and bake for 15–18 minutes until lightly golden.
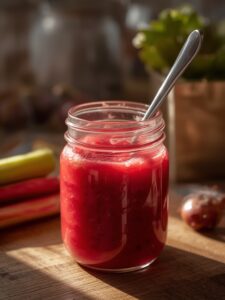
- In a saucepan, combine pineapple, sugar, cornstarch, and lemon juice. Cook over medium heat, stirring constantly until thickened.
- Remove from heat and stir in vanilla extract.
- Pour hot filling over the baked crust and spread evenly.
- Return to oven and bake for 20–25 minutes until set and lightly golden.
- Cool completely, then refrigerate before slicing and serving.
Notes
Nutrition
Creating perfect pineapple bars involves two main components: preparing the buttery crust and making the luscious pineapple filling. The process is straightforward, making this pineapple bars recipe ideal even for beginning bakers.
Follow these steps carefully for consistent results. I’ve refined this method through countless test batches in my Asheville kitchen, identifying the exact techniques that yield that perfect texture and flavor balance.
How Do You Make the Perfect Crust for Pineapple Bars?
The foundation of exceptional pineapple bars is a perfectly textured crust that’s crisp yet tender. This shortbread-style base provides the ideal contrast to the soft pineapple topping.
When making the crust for my pineapple bars recipe, I always start with these steps:
1. Preheat your oven to 350°F (175°C) and line your 9×13 baking pan with parchment paper
2. Combine 2 cups all-purpose flour, 1/2 cup granulated sugar, and 1/4 teaspoon salt in a large bowl
3. Cut in 1 cup cold unsalted butter (cubed) using a pastry cutter or your fingertips until the mixture resembles coarse crumbs
4. Press the mixture firmly into your prepared pan to create an even layer
5. Bake for 15-18 minutes until the edges are just barely golden
The key technique I’ve learned is to avoid overworking the dough. I gently press rather than compact the mixture, which ensures that perfect tender-crisp texture once baked.
What’s the Secret to Perfect Pineapple Filling?
The filling for these pineapple bars should strike a balance between sweet and tangy, with a smooth consistency that sets properly. After many experiments, I’ve found this method delivers consistent results.
For the perfect pineapple filling in this pineapple bars recipe:
1. Combine 2 cups fresh pineapple (finely chopped) or drained crushed canned pineapple in a medium saucepan
2. Add 3/4 cup granulated sugar, 3 tablespoons cornstarch, and 2 tablespoons lemon juice
3. Cook over medium heat, stirring constantly until the mixture thickens (about 5-7 minutes)
4. Remove from heat and stir in 1 teaspoon vanilla extract
5. Pour the hot filling over the pre-baked crust
6. Return to oven and bake for an additional 20-25 minutes until set and lightly golden
I discovered through testing that the cornstarch amount is crucial – too little and the bars won’t set properly; too much and they become rubbery. The 3 tablespoons specified here creates that perfect, sliceable consistency.
Tips for Serving and Storing Your Pineapple Bars
The way you serve and store these pineapple bars can significantly impact their texture and flavor. Through years of making this recipe for family gatherings and potlucks in Asheville, I’ve learned the optimal handling techniques.
For the best experience with this pineapple bars recipe, follow these serving and storage guidelines I’ve perfected through extensive testing and feedback from family and friends.
What’s the Best Way to Cut and Present Pineapple Bars?
Properly cutting and presenting your pineapple bars elevates them from a simple dessert to an impressive treat. The right technique ensures clean, attractive portions.
For perfect presentation of your pineapple bars recipe:
– Allow bars to cool completely before cutting (at least 2 hours, preferably 4)
– Refrigerate for 1 hour after cooling for cleaner cuts
– Use a sharp knife wiped clean between cuts
– Cut into 16-20 pieces depending on your preference
– Dust lightly with powdered sugar just before serving for an elegant finish
– Serve with a small dollop of whipped cream for special occasions
When I host summer gatherings, I often garnish these bars with a small mint leaf and a thin pineapple wedge. The vibrant yellow color makes for a beautiful presentation that always draws compliments.
How Long Do Pineapple Bars Stay Fresh?
Proper storage is essential for maintaining the quality of your pineapple bars. When stored correctly, they maintain their delicious flavor and texture for several days.
For optimal freshness of your pineapple bars recipe results:
– Store in an airtight container in the refrigerator
– Place parchment paper between layers if stacking
– Consume within 4 days for best quality
– Bring to room temperature for 15-20 minutes before serving for optimal flavor
– Freeze for up to 2 months by wrapping tightly in plastic wrap and aluminum foil
I’ve found these bars actually taste better on the second day, after the flavors have had time to meld. When teaching cooking classes, I often prepare them the day before for this very reason.
Variations and Customizations for Pineapple Bars
One of the things I love most about this pineapple bars recipe is its versatility. Over the years in my Asheville kitchen, I’ve created numerous variations that maintain the essence of the original while offering exciting new flavor profiles.
These customizations allow you to adapt the basic pineapple bars recipe to suit different occasions, dietary needs, or simply to experiment with new flavor combinations.
How Can I Make These Pineapple Bars Healthier?
Creating a healthier version of these pineapple bars doesn’t mean sacrificing flavor. With a few thoughtful substitutions, you can reduce calories and increase nutritional value.
For a lighter version of this pineapple bars recipe:
– Replace half the all-purpose flour with whole wheat flour for added fiber
– Reduce sugar in the filling to 1/2 cup if using sweet, ripe pineapple
– Substitute coconut oil for half the butter in the crust for healthy fats
– Add 1/4 cup chopped nuts like walnuts or pecans to the crust for protein and texture
– Use honey instead of sugar in the filling (reduce to 1/2 cup)
When my sister was following a lower-sugar diet during pregnancy, I developed this variation. She was thrilled to still enjoy her favorite dessert in a more nutritious form. According to Wikipedia, pineapples are naturally rich in vitamin C and manganese, making them a nutritious choice for desserts.
What Other Fruits Can I Pair With Pineapple?
The bright tropical flavor of pineapple pairs beautifully with many other fruits, creating exciting new variations on the basic pineapple bars recipe.
Try these delicious fruit combinations in your pineapple bars:
– Pineapple-coconut: Add 1/2 cup toasted coconut to the filling
– Pineapple-mango: Replace 1/2 cup of pineapple with diced mango
– Pineapple-berry: Add 1 cup fresh blueberries or raspberries to the filling
– Pineapple-banana: Add 1 sliced banana to the filling for a tropical twist
– Pineapple-citrus: Add 1 tablespoon orange zest to the filling for brightness
The pineapple-coconut variation has become a signature dessert at my summer cookouts. My neighbor Maria specifically requests it every year for our block party, saying it reminds her of her childhood in Hawaii.
These pineapple bars have become much more than just a recipe in my kitchen—they’re a connection to family traditions, a crowd-pleasing staple at gatherings, and a versatile canvas for culinary creativity. I hope they bring the same joy to your kitchen as they have to mine!